Android 面试题纪录(一)

目录

  1. JVM和DVM的不同
  2. Android如何启动一个应用
  3. UI Thread 如何工作
  4. UI Thread 消息机制 API 概览
  5. 阐述 MessageQueue.IdleHandler
  6. Android 平台如何调度线程
  7. Android下线程有哪些通信方式
  8. 进程间如何通信
  9. Android 如何管理内存


1. JVM和DVM的不同

  • JVM is a stack-based machine; while DVM is register-based(执行相同任务比JVM使用更少的指令);
  • A stack-based virtual machine must transfer data from registers to the operand stack before manipulating them. In contrast, a register-based VM operates by directly using virtual registers. This increases the relative size of instructions because they must specify which registers to use, but reduces the number of instructions that must be executed to achieve the same result.

2. Android如何启动一个应用

Zygote启动应用流程

  • Android启动时将率先运行一个独特的进程Zygote。而Zygote将启动一虚拟机,该虚拟机将预先加载Android核心库并初始化各种共享资源体,最后它将使用套接字进行监听。
  • 当用户启动一个Android应用时,Zygote将创建一个虚拟机(通过写时复制(Copy-On-Write)的技术拷贝Zygote虚拟机)以便其运行,并以子进程的身份和其父进程共享内存。

3. UI Thread 如何工作

UI Thread 由平台内部 android.app.ActivityThread 类管理。

  • 默认情况下,为Android应用开发的代码都会通过主线程(UI Thread)运行;
  • 如果应用不能在5秒内响应用户,那么用户将会看到一个显示ANR对话框并提供退出选项以允许用户终止该应用;
  • Android设计致力于同步人眼与硬件(屏幕)刷新率,这意味着Android每秒绘制屏幕60帧数;
  • Android平台线程通信拥有自己的处理机制(Message Passing Mechanism)。该机制以非阻塞生产者消费者模式实现,其生产者和消费者在消息传送时都不会被阻塞;另外生产者可往消息队列在任意时间任意位置中插入新的消息;
  • API 16之后,Android引进了一个新的Choreographer对象以监控帧数时序,并在连续丢掉30帧后在日志中予以丢帧的警告;

The UI thread Looper

  • UI Thread是唯一默认装配了Looper的线程,并且先于应用组件的初始化,另外该 Looper 不能通过 Looper.quit() 终止,否则抛出 RuntimeException;
  • 关于UI Thread Looper和其它线程Looper的几点实用性区别: UI Thread Looper通过Looper.getMainLooper()可从任意位置获取;并且Looper是Android运行时环境是通过Looper.prepareMainLooper()方法装配的. 每一个应用只能进行装配一次,因此试图为其它线程装配将会抛出异常;

在 UI Thread 上捕捉异常

  • 当应用启动时,Android 运行时有一个全局对象 UncaughtExceptionHandler。默认情况下,它将杀死该进程。
  • 但我们可以对其进行覆盖方法。典型地,覆盖方法应该只是增加一些功能。示例如下:
1
2
3
4
5
6
7
8
9
10
11
12
13
14
15
// Set new global handler
Thread.setDefaultUncaughtExceptionHandler(new ErrorReportExceptionHandler());
// Error handler that redirects exception to the system default handler.
public class ErrorReportExceptionHandler
implements Thread.UncaughtExceptionHandler {
private final Thread.UncaughtExceptionHandler defaultHandler;
public ErrorReportExceptionHandler() {
this.defaultHandler = Thread.getDefaultUncaughtExceptionHandler();
}
@Override
public void uncaughtException(Thread thread, Throwable throwable) {
reportErrorToFile(throwable);
defaultHandler.uncaughtException(thread, throwable);
}
}

如何查看 UI Thread

下面名为 com.eat 默认就是应用启动时的 UI Thread。

1
2
3
4
5
6
7
8
9
10
11
12
$ adb shell ps -t | grep u0_a72
USER PID PPID VSIZE RSS WCHAN PS NAME
u0_a72 4257 144 320304 34540 ffffffff 00000000 S com.eat
u0_a72 4259 4257 320304 34540 ffffffff 00000000 S GC
u0_a72 4262 4257 320304 34540 ffffffff 00000000 S Signal Catcher
u0_a72 4263 4257 320304 34540 ffffffff 00000000 S JDWP
u0_a72 4264 4257 320304 34540 ffffffff 00000000 S Compiler
u0_a72 4265 4257 320304 34540 ffffffff 00000000 S ReferenceQueueDemon
u0_a72 4266 4257 320304 34540 ffffffff 00000000 S FinalizerDaemon
u0_a72 4267 4257 320304 34540 ffffffff 00000000 S FinalizerWatchdogDaemon
u0_a72 4268 4257 320304 34540 ffffffff 00000000 S Binder_1
u0_a72 4269 4257 320304 34540 ffffffff 00000000 S Binder_2

与UI Thread通信代码片段

1
2
3
4
5
6
7
8
9
10
Runnable task = new Runnable() {...};
new Handler(Looper.getMainLooper()).post(task);
// Method called on UI thread.
private void postFromUiThreadToUiThread() {
new Handler().post(new Runnable() { ... }); // 改行代码将成为目前正在执行消息处理的一部分,并在添加此新消息这个动作之前执行.
}
// Method called on UI thread.
private void postFromUiThreadToUiThread() {
runOnUiThread(new Runnable() { ... }); // The code at this point is executed after the message.
}

4. UI Thread 消息机制 API 概览

android.os.Handler: 消费者线程消息处理器,提供接口予以生产者线程往队列插入消息. 一个Looper或许有多个与之关联的Handler,但只有一个队列。
android.os.Looper: 一次只有一个并只与消费者线程关联的消息分发器。
android.os.MessageQueue: 无边界链表结构,每一个Looper和线程最多拥有一个消息队列。
android.os.Message: 在消费者线程进行消费的消息。

message-passing机制概览

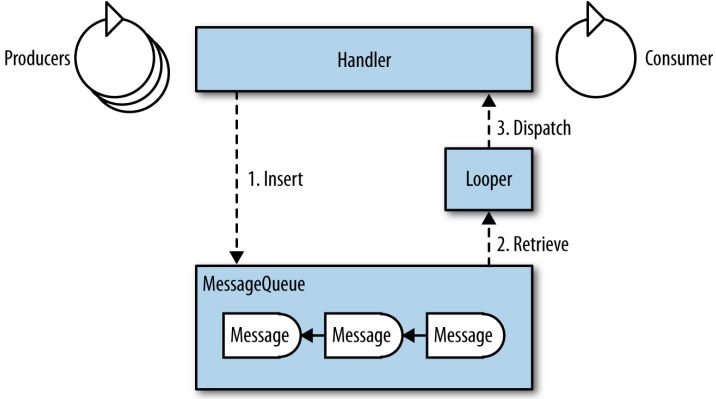
  • Insert: 生产者线程通过与消费者线程关联的Handler往队列插入消息。
  • Retrieve: 通过Looper顺序地从队列取出消息以供消费者线程消费。
  • Dispatch: 由Looper负责保证将消息分发到正确的Handler。
1
2
3
4
5
6
7
8
9
10
11
12
13
14
15
16
17
18
19
20
21
22
23
24
25
26
27
28
29
30
31
32
// 示例: Basic Message Passing
public class LooperActivity extends Activity {
LooperThread mLooperThread;
private static class LooperThread extends Thread { // 该线程负责插入消息
public void run() {
Looper.prepare();
mHandler = new Handler() {
public void handleMessage(Message msg) {
if(msg.what == 0) { doLongRunningOperation(); }
}
};
Looper.loop(); // 开始从队列取消息并分发到消费者线程,这是一个阻塞调用,
}
}
public void onCreate(Bundle savedInstanceState) {
super.onCreate(savedInstanceState);
mLooperThread = new LooperThread();
mLooperThread.start();
}
public void onClick(View v) {
if (mLooperThread.mHandler != null) {
Message msg = mLooperThread.mHandler.obtainMessage(0);
mLooperThread.mHandler.sendMessage(msg); // 往队列插入消息
}
}
private void doLongRunningOperation() {
// Add long running operation here.
}
protected void onDestroy() {
mLooperThread.mHandler.getLooper().quit(); // Terminate the background thread.
}
}

5. 阐述 MessageQueue.IdleHandler

如果当前没有消息要处理,这时,消费者线程将处于空闲时段,与其等待消息的道来,其它线程将会在此空闲时段获得机会执行。
When the message queue detects idle time for the consumer thread, it invokes queueIdle() on all registered IdleHandler-instances. It is up to the application to implement the callback responsibly.

1
2
3
4
5
6
7
8
9
10
11
12
13
14
// Get the message queue of the current thread.
MessageQueue mq = Looper.myQueue();
// Create and register an idle listener.
MessageQueue.IdleHandler idleHandler = new MessageQueue.IdleHandler();
mq.addIdleHandler(idleHandler)
// Unregister an idle listener.
mq.removeIdleHandler(idleHandler)
interface IdleHandler {
boolean queueIdle();
}
// 实现该接口的 queueIdle() 方法必须返回一个具有以下含义的布尔值:
// true: The idle handler is kept active; it will continue to receive callbacks for successive idle time slots.
// false: The idle handler is inactive; it will not receive anymore callbacks for successive idle time slots.

6. Android 平台如何调度线程

Priority:更改线程执行的优先级

  • java.lang.Thread:
  • setPriority(int priority); // from 0 (least prioritized) to 10 (most prioritized).
  • android.os.Process
  • Process.setThreadPriority(int priority); // 在执行的线程里.
  • Process.setThreadPriority(int threadId, int priority);

Control group:更改线程所属的控制组(control group,Android 特有)

  • Android 自定义了很多控制组,但最重要的是前端(Foreground)控制组和后端(Background)控制组。
  • 默认创建的线程和 UI Thread 拥有相同的优先级和控制组,因此它们将为获得处理器资源而互相竞争。为了避免大量后台线程影响 UI Thread 的性能,可通过如下方式解决。
  • 更改所属控制组:Process.setThreadPriority(Process.THREAD_PRIORITY_BACKGROUND)
1
2
$ adb shell ps -P | grep u0_a72 # 显示前台线程 : fg
u0_a72 4257 144 320304 34504 fg ffffffff 00000000 S com.eat

7. Android下线程有哪些通信方式(数据结构)

管道

1
2
3
4
5
6
7
8
9
10
11
12
13
14
15
16
17
int BUFFER_SIZE_IN_CHARS = 1024 * 4;
PipedReader r = new PipedReader(BUFFER_SIZE_IN_CHARS); // 默认 1024 字节
PipedWriter w = new PipedWriter(r);
Thread t = new MyReaderThread(r);
t.start();
// Producer thread: Flush the pipe after a write.
w.write('A');
w.flush();
// Consumer thread: Read the data in a loop.
int i;
// when the buffer is empty, the PipedReader uses a blocking call to wait() with one-second timeout.
while((i = reader.read()) != -1){
char c = (char) i;
}
//
w.close();
r.close();

共享内存

信号量(该技术被认为是最容易出错的技术)

  • synchronized: Object.wait() / Object.wait(timeout); Object.notify() / Object.notifyAll()
  • ReentrantLock: Condition.await() / Condition.await(timeout); Condition.signal() / Condition.signalAll()
  • ReentrantReadWriteLock: Condition.await() / Condition.await(timeout); Condition.signal() / Condition.signalAll()

阻塞队列

1
2
3
4
5
6
7
8
9
10
11
12
13
14
15
public class ConsumerProducer {
private final int LIMIT = 10;
private BlockingQueue<Integer> blockingQueue = new LinkedBlockingQueue<Integer>(LIMIT);
public void produce() throws InterruptedException {
int value = 0;
while (true) {
blockingQueue.put(value++);
}
}
public void consume() throws InterruptedException {
while (true) {
int value = blockingQueue.take();
}
}
}

Android Message Passing(参考第4题)

  • The lifecycle of a message: create(initialized) -> enqueue(pending) -> dispatch(dispatched) -> recycle(recycled) -> (initialized)

创建消息的 API:
Message m = new Message();
Message m = Message.obtain(); // empty message
Message m = Message.obtain(Handler h);
Message m = Message.obtain(Handler h, int what);
Message m = Message.obtain(Handler h, int what, Object o);
Message m = Message.obtain(Handler h, int what, int arg1, int arg2);
Message m = Message.obtain(Handler h, int what, int arg1, int arg2, Object o);
Message m = Message.obtain(Handler h, Runnable task); // task message
Message m = Message.obtain(Message originalMsg); // copy constructor

Handler

  • Constructors without an explicit Looper bind to the Looper of the current thread: new Handler(); 或 new Handler(Handler.Callback)
  • Constructors with an explicit Looper bind to that Looper: new Handler(Looper); 或 new Handler(Looper, Handler.Callback);
  • Message insertion, The sorting is based on the time parameter, and it is the only way an application can affect the dispatch order: default(Immediately eligible for dispatch),at_front(dispatch at time 0. Hence, it will be the next dispatched message, unless another is inserted at the front before this one is processed), delay(The amount of time after which this message is eligible for dispatch),uptime(The absolute time at which this message is eligible for dispatch)
1
2
3
4
5
6
7
8
9
10
11
12
13
14
15
16
17
18
19
20
21
22
23
24
25
26
27
28
29
30
31
32
33
34
35
36
37
38
39
40
41
42
43
44
45
46
47
48
49
50
51
52
53
54
55
56
57
58
59
60
61
62
63
64
65
66
67
68
69
70
71
72
73
74
75
76
77
78
79
80
// 往消息队列中添加任务:
boolean post(Runnable r)
boolean postAtFrontOfQueue(Runnable r)
boolean postAtTime(Runnable r, Object token, long uptimeMillis)
boolean postAtTime(Runnable r, long uptimeMillis)
boolean postDelayed(Runnable r, long delayMillis)
// 往消息队列中添加消息实体:
boolean sendMessage(Message msg)
boolean sendMessageAtFrontOfQueue(Message msg)
boolean sendMessageAtTime(Message msg, long uptimeMillis)
boolean sendMessageDelayed(Message msg, long delayMillis)
// 往消息队列中添加简单的分发指示:
boolean sendEmptyMessage(int what)
boolean sendEmptyMessageAtTime(int what, long uptimeMillis)
boolean sendEmptyMessageDelayed(int what, long delayMillis)
// 插入时可能发生的错误
// RuntimeException: Message has no Handler; Message has already been dispatched and is being processed.
// Return false: Message is inserted after Looper.quit() has been called.
//
// 示例1
private class BackgroundThread extends Thread {
private Handler mBackgroundHandler;
public void run() {
Looper.prepare();
mBackgroundHandler = new Handler();
Looper.loop();
}
public void doWork() {
mBackgroundHandler.post(new Runnable() {
@Override public void run() {
Message uiMsg = mUiHandler.obtainMessage(SHOW_PROGRESS_BAR, 0, 0, null);
mUiHandler.sendMessage(uiMsg);
Random r = new Random();
int randomInt = r.nextInt(5000);
SystemClock.sleep(randomInt);
uiMsg = mUiHandler.obtainMessage(HIDE_PROGRESS_BAR, randomInt, 0, null);
mUiHandler.sendMessage(uiMsg);
}
});
}
public void exit() {
mBackgroundHandler.getLooper().quit();
}
}
// 示例2
private final Handler mUiHandler = new Handler() {
public void handleMessage(Message msg) {
switch(msg.what) {
case SHOW_PROGRESS_BAR:
mProgressBar.setVisibility(View.VISIBLE);
break;
case HIDE_PROGRESS_BAR:
mText.setText(String.valueOf(msg.arg1));
mProgressBar.setVisibility(View.INVISIBLE);
break;
}
}
};
// 示例3
public class HandlerCallbackActivity extends Activity implements Handler.Callback {
@Override public boolean handleMessage(Message msg) {
switch (msg.what) {
case 1:
msg.what = 11;
return true;
default:
msg.what = 22;
return false;
}
}
public void onHandlerCallback(View v) { // 此处为 button 的点击事件处理器
Handler handler = new Handler(this) {
@Override public void handleMessage(Message msg) {
// Process message
}
};
handler.sendEmptyMessage(1);
handler.sendEmptyMessage(2);
}
}
1
2
3
4
5
6
7
8
9
10
11
12
// 移除任务
removeCallbacks(Runnable r)
removeCallbacks(Runnable r, Object token)
// 移除简单指示实体
removeMessages(int what)
removeMessages(int what, Object object)
// Remove tasks and data messages from the message queue
removeCallbacksAndMessages(Object token)
// Taking a snapshot of the current message queue
mWorkerHandler.dump(new LogPrinter(Log.DEBUG, TAG), "");
// Tracing the message queue processing
Looper.myLooper().setMessageLogging(new LogPrinter(Log.DEBUG, TAG));

8. 进程间如何通信

Android RPC

  • IPC由Linux系统管理,支持以下几种IPC机制: signals, pipes, message queues, semaphores, and shared memory. 而经过修改过的Android版Linux,其IPC机制已被替换为binder框架,该框架使用RPC方式在进程间通信。IPC可以是双通道的。

RPC方式通信包含以下步骤:

  1. Method and data decomposition, also known as marshalling
  2. Transferring the marshalled information to the remote process
  3. Recomposing the information in the remote process, also known as unmarshalling
  4. Transferring return values back to the originating process

Binder

IPC through binder

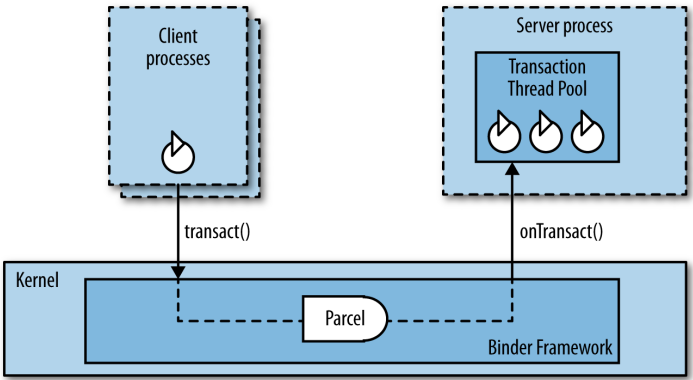
  • 客户端线程在交互时默认是阻塞的,直到远程的线程完成onTransact()方法。
  • 交互数据由对象android.os.Parcel组成, 该对象经过优化以便通过Binder和进程交互。
  • onTransact()方法在binder线程池中的某一线程执行。该线程池存在的意义只在于为了处理从其它进程而来的消息;并且它最多只能有16个线程。
1
2
3
4
5
6
7
8
9
10
11
12
13
14
15
16
17
18
19
20
21
22
23
24
25
26
27
28
29
30
31
32
33
34
35
36
37
38
39
40
41
42
43
44
45
46
47
48
49
50
51
52
53
54
55
56
57
58
59
60
61
62
63
64
65
66
67
68
69
70
71
72
73
74
75
76
77
78
79
80
81
82
83
84
85
86
87
88
89
90
91
92
93
94
95
96
97
// Message Passing Using the Binder : One-Way Communication
public class WorkerThreadService extends Service {
WorkerThread mWorkerThread;
Messenger mWorkerMessenger;
@Override public void onCreate() {
super.onCreate();
mWorkerThread.start();
}
public IBinder onBind(Intent intent) {
return mWorkerMessenger.getBinder();
}
@Override public void onDestroy() {
super.onDestroy();
mWorkerThread.quit();
}
/**
* Worker thread has prepared a looper and handler.
**/
private void onWorkerPrepared() {
mWorkerMessenger = new Messenger(mWorkerThread.mWorkerHandler);
}
private class WorkerThread extends Thread {
Handler mWorkerHandler;
@Override public void run() {
Looper.prepare();
mWorkerHandler = new Handler() {
@Override public void handleMessage(Message msg) {
// Implement message processing
}
};
onWorkerPrepared();
Looper.loop();
}
public void quit() {
mWorkerHandler.getLooper().quit();
}
}
}
public class MessengerOnewayActivity extends Activity {
private boolean mBound = false;
private Messenger mRemoteService = null;
private ServiceConnection mRemoteConnection = new ServiceConnection() {
public void onServiceConnected(ComponentName className, IBinder service) {
mRemoteService = new Messenger(service);
mBound = true;
}
public void onServiceDisconnected(ComponentName className) {
mRemoteService = null;
mBound = false;
}
};
public void onCreate(Bundle savedInstanceState) {
super.onCreate(savedInstanceState);
Intent intent = new Intent("com.wifill.eatservice.ACTION_BIND");
bindService(intent, mRemoteConnection, Context.BIND_AUTO_CREATE);
}
public void onSendClick(View v) {
if (mBound) {
mRemoteService.send(Message.obtain(null, 2, 0, 0));
}
}
}
// Two-Way Communication
public void run() {
Looper.prepare();
mWorkerHandler = new Handler() {
@Override public void handleMessage(Message msg) {
switch (msg.what) {
case 1:
try {
msg.replyTo.send(Message.obtain(null, msg.what, 0, 0));
} catch (RemoteException e) {
Log.e(TAG, e.getMessage());
}
break;
}
}
};
onWorkerPrepared();
Looper.loop();
}
}
public void onSendClick(View v) {
if (mBound) {
try {
Message msg = Message.obtain(null, 1, 0, 0);
msg.replyTo = new Messenger(new Handler() {
@Override public void handleMessage(Message msg) {
Log.d(TAG, "Message sent back - msg.what = " + msg.what);
}
});
mRemoteService.send(msg);
} catch (RemoteException e) {
Log.e(TAG, e.getMessage());
}
}
}

AIDL(Android Interface Definition Language)

AIDL remote procedure

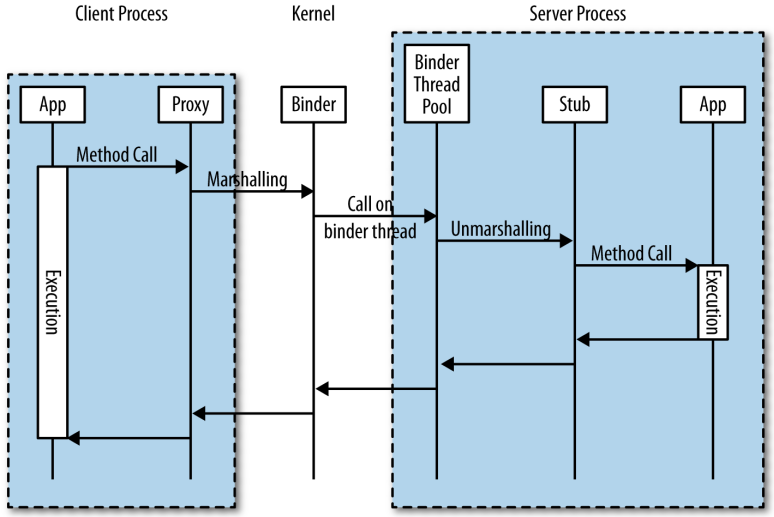
  • The generated Java interface is included in all the client applications and in the server application. The interface file defines two inner classes, Proxy and Stub, that handle all the marshalling and unmarshalling of the data, as well as the transaction itself.
1
2
3
4
5
6
7
8
9
10
11
12
13
14
15
16
17
18
19
// Synchronous RPC : ISynchronous.aidl
interface ISynchronous {
String getThreadNameFast();
String getThreadNameSlow(long sleep);
String getThreadNameBlocking();
String getThreadNameUnblock();
}
//
private final ISynchronous.Stub mBinder = new ISynchronous.Stub() {
CountDownLatch mLatch = new CountDownLatch(1);
@Override
public String getThreadNameFast() throws RemoteException {
return Thread.currentThread().getName();
}
//...
}
//
ISynchronous mISynchronous = ISynchronous.Stub.asInterface(binder);
String remoteThreadName = mISynchronous.getThreadNameFast();

异步 RPC(在 AIDL 中通过关键字 oneway 定义)

1
2
3
4
5
6
7
8
9
10
11
12
13
14
15
16
17
18
19
20
21
22
23
24
25
26
27
28
29
30
31
32
33
34
// Asynchronous interface
oneway interface IAsynchronousInterface {
void method1();
void method2();
}
// Asynchronous method
interface IAsynchronousInterface {
oneway void method1();
void method2();
}
// 示例1
interface IAsynchronous1 {
oneway void getThreadNameSlow(IAsynchronousCallback callback);
}
// The implementation of the remote interface in the server process
IAsynchronous1.Stub mIAsynchronous1 = new IAsynchronous1.Stub() {
@Override
public void getThreadNameSlow(IAsynchronousCallback callback) throws RemoteException {
String threadName = Thread.currentThread().getName();
SystemClock.sleep(10000);
callback.handleResult(threadName);
}
};
interface IAsynchronousCallback {
void handleResult(String name);
}
// And the implementation of the callback interface in the client process handles the result:
private IAsynchronousCallback.Stub mCallback = new IAsynchronousCallback.Stub() {
@Override
public void handleResult(String remoteThreadName) throws RemoteException {
Log.d(TAG, "remoteThreadName = " + name);
Log.d(TAG, "currentThreadName = " + Thread.currentThread().getName());
}
}

9. Android 如何管理内存

内存泄漏的广泛定义:

  1. 内存没有被回收;
  2. 内存一次分配过多,有可能导致内存耗尽;
  • GC 使用标记-清扫方式(mark-and-sweep);
  • 其标记工作方式如下图所示

GC 标记工作方式

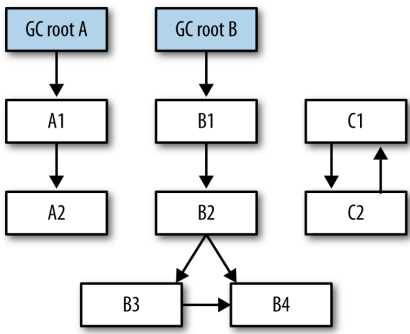
注:任何可以在堆(heap)外访问到的对象都统称为 GC root,这包括静态对象(static objects)、在堆栈的本地对象(local objects)和线程。
GC root A→A1→A2
GC root B→B1→B2→B3→B4
GC root B→B1→B2→B4

与线程相关的内存泄漏

  • 当线程执行时,线程对象本身便成为GC root,所有线程创建的相关对象都将被标记为不可回收;
  • 当线程实现为内部类时,该线程对象将持有其外部类对象的引用,因此,只要线程不终止,外部类对象将不可回收;
  • 当线程实现为静态内部类时,线程对象持有外部类的引用,但不是外部类对象,因此外部类对象在没有其它引用链接它时可被回收;但如果程序员想将线程执行的环境(Thread)和执行对象(Runnable)分开,并将执行对象实现为内部类时,该执行对象将获得对线程外部类对象的一个引用,从而导致外部类对象不可被回收, 如下示例;
1
2
3
4
5
6
7
8
9
10
11
12
13
14
15
16
public class Outer {
public void sampleMethod() {
SampleThread sampleThread = new SampleThread(new Runnable() {
@Override public void run() {
Object sampleObject = new Object();
// Do execution
}
});
sampleThread.start();
}
private static class SampleThread extends Thread {
public SampleThread(Runnable runnable) {
super(runnable);
}
}
}
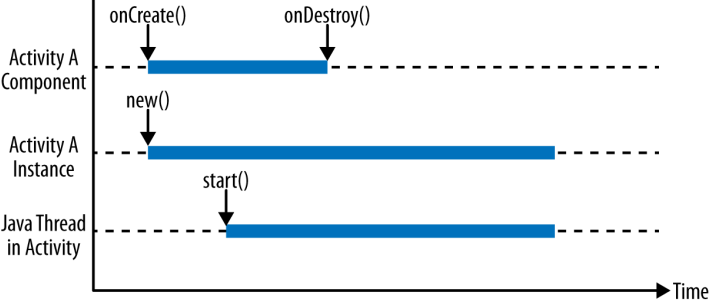
  • Android 应用组件与线程之间生命期的不协调,比如下图所示,Activity 对象在生命期结束后(onDestroy())仍然停留在堆上,其原因是 Activity 在活动期间启动的一线程仍在运行当中。

1
2
3
4
5
6
7
8
9
10
11
12
13
14
15
16
17
18
19
20
21
22
23
24
25
26
27
28
// 示例1:发送一数据消息,该示例演示了广义上的内存泄漏
public class Outer {
Handler mHandler = new Handler() {
public void handleMessage(Message msg) {
// Handle message
}
};
public void doSend() {
Message message = mHandler.obtainMessage();
message.obj = new SampleObject();
mHandler.sendMessageDelayed(message, 60 * 1000);
}
}
// 示例2:寄送一任务消息(Posting a task message)
public class Outer {
Handler mHandler = new Handler() {
public void handleMessage(Message msg) {
// Handle message
}
};
public void doPost() {
mHandler.post(new Runnable() {
public void run() {
// Long running task
}
});
}
}

如何避免内存泄漏

  • 使用静态内部类;
  • 使用弱引用(Weak References);显式置空强引用(strong references);
  • 及时停止线程执行;